Irish Flute Foundations
Instrument
Irish Flute
Sections
13
Videos
0
Congratulations on deciding to learn the Irish Flute! It's a great instrument and with patience and consistent practice, will bring you and your listeners much joy!
This is my introductory course for the Irish Flute and is perfect for anyone just starting out or for those that have been playing a while but want to brush up on some foundational concepts.
Topics Covered
- Irish Flute Diagram
- Getting a Sound
- Grip & Posture
- Covering the Holes
- D & G Major Scales
- Embouchure & Tone
- Throat & Tongue Articulation
- Breathing
- 4 Simple Tunes
- 4 irish Traditional Tunes
Resources:
- Fingering Chart
- How to Read Music
- The Amazing Slow Downer Music Slow-Down Software
Section 1: The Basics
Practicing any discipline takes lots of patience! Be patient with yourself especially in Section 1 where you might want to jump ahead to "Trad Tunes". In the first section, for purposes of example and ease of learning, I use simple tunes such as Mary Had a Little Lamb, London Bridge, etc… This is done on purpose! Since you are already familiar with these melodies, less time is spent on learning the tunes themselves thus allowing you to focus more attention on the concepts & techniques I'll be trying to communicate.
Learning by Ear vs. Notation
I have provided both video footage and written notation of all examples, exercises and tunes. While being able to read music is a good skill to have, it is not necessary for the traditional Irish musician. I strongly encourage you to learn the examples by ear (through the video examples) as Irish Traditional Music is best learned this way. You will find as you progress that written notation falls very short of communicating Irish traditional music's finer and more defining points.
Left-Handed Players
If you are left-handed and wish to learn this way (foot-joint of flute pointed to your left) then you will need to substitute "left" for "right" in this tutorial. If you are just starting out you might decide now to learn right-handed (foot-joint pointed to the right) as it will make it easier on you down the road when purchasing a flute (especially if you are looking at second hand instruments). It can actually be an advantage to have your left hand be the more dexterous hand when playing the flute right-handed.
Below you will find a diagram of an Irish Flute with 8 Keys. The flute that I will be playing in the following video clips actually has no keys. A keyless flute such as mine is perfectly suitable to play Irish Traditional Music. However, it is nice to have keys for the odd tune that requires them or for playing other types of music.
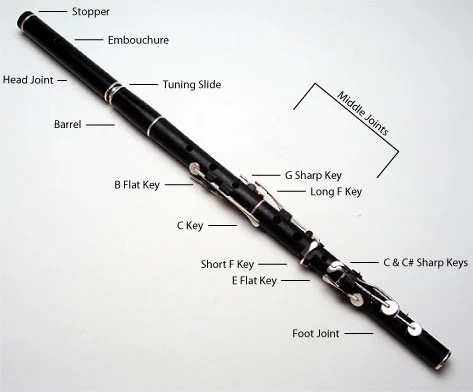
A few comments on the diagram…
The Stopper

There is a stopper, usually made of cork, inside your head joint. This is positioned by the maker of your flute to ensure that it plays well in tune throughout the octaves. It is best left alone unless you feel that your flute isn't performing as it should. In which case, the best thing to do is to consult the maker or retailer you purchased it from.
The Embouchure
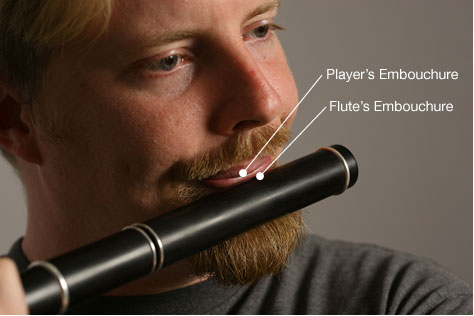
The embouchure is the hole that you blow in/across to sound the flute. The term "embouchure" is interchangeably used to describe the small hole created by your lips that focuses a steady stream of air in/across the embouchure of the flute.
The Tuning Slide
The tuning slide enables you to tune your flute to a specific pitch. Just as you hear an orchestra tune before a performance (they tune usually to A=440hz), you will also hear musicians in a session tune to a fixed pitch instrument such as an accordion.
The Keys & Finger Holes
For our purposes in this tutorial, we will only be looking at playing using the finger holes. If your flute does have keys, feel free to play around with them. We will be discussing their use in upcoming tutorials.
Section 2: Trad Tunes
Before we get started, let's talk about breathing. In the tunes that follow, I have indicated good places to breathe within the tunes with a red single quotation mark. You don't have to breathe every time you see the mark if you have enough air to make it to the next mark. As you learn more tunes you will start to intuitively learn where to take breaths without affecting the flow and rhythm of the tune.
Make sure that you are breathing from your belly. This will allow you to take in the most amount of air. It's a common mistake to breathe in a way that just fills in the area around your rib cage. Since your ribs aren't that flexible (like the area around your belly), you simply can't breathe in enough air. A good way to get a sense of proper breathing is to lay on the floor and put a heavy book on your belly. You will naturally breathe from your belly when in this position and the book will go up and down as you breathe. Try to breathe in the same manner when standing or sitting. If your shoulders are raising when you're breathing then you know you're not breathing from your belly!
It might help to practice this type of breathing in front of a mirror so that you can watch to make sure your belly fills with air and that your shoulders stay down and relaxed.